3D printer woes
I got a 3D printer, the Anet A8. After fiddling with the parts for a few hours I managed to get it assembled.
Issues
Motor not working
After setting it up and configuring the printer, I noticed my extruder did not want to extrude. It seemed to be skipping, see the video. It turned out to be a dead stepper driver. I got a refund and bought a RAMPS.
RAMPS default config
The default config for RAMPS does NOT work with the Anet A8 at all. I'll upload my config after I finish calibrating it.
Noise
Once the printer was working, I noticed it was making a HELL of a noise. It was totally unexpected. The problem was that the printer was using my heavy (30kg+) table as a speaker.
I printed some supports (these) to decouple the printer from the table and the noise dropped significantly.
Control
You can control your printer with the built in keys and print files from the SD card but that gets annoying quick.
Other option is to use some desktop software to both slice & control the printer.
I opted for a third option, installing OctoPi on a raspberry pi zero W.
OctoPi
Even though it is advised to NOT use OctoPi on a pi zero W I had no issues, but I do not use a camera.
Pi tuning
The pi zero is slow enough without random services popping up to do stuff while you are printing. I disabled:
apt-daily.service
apt-daily-upgrade.service
bluetooth.service
alsa-restore.service
webcamd.service
As I can manually upgrade the software on my pi and I am running with no bluetooth/audio.
I also set
start_x=0
gpu_mem=16
in /boot/config.txt.
This has an end result of:
$ systemd-analyze
Startup finished in 1.729s (kernel) + 23.360s (userspace) = 25.089s
Of which 9s (!!) is just for DHCP.
Printer tuning
In order of importance:
- Calibrate your extruder (link)
- Do PID Tuning (link)
- Calibrate your X/Y axes (link)
- Print a heat tower to see what's the best temperature for your filament (link)
Fancy stuff
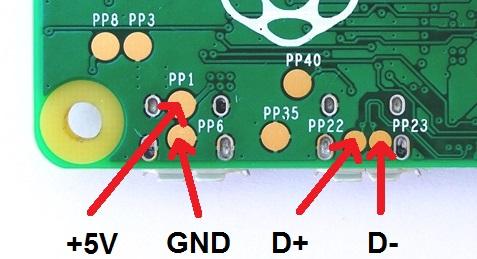
PSU
I connected my pi with a buck converter (LM2596s) directly to my 12v psu and soldered it to the test pads as seen in the following image:
Lighting
I connected a transistor to a gpio pin so I can toggle my printer lights remotely. I guess this will become useful in the future when I have a camera.
 RSS feed